Installation
Linux Debian Based
Install pilight by using the apt repository in Debian / Ubuntu based distributions.
Login to your computer.
Make sure you are running as root. Run the following command and use your own password.
pi@pilight:~# sudo su
Password:
Add the apt repository to the apt sources list:
pi@pilight:~# echo "deb http://apt.pilight.org/ stable main" > /etc/apt/sources.list.d/pilight.list
If you want to install the nightly version of pilight then also add:
root@pilight:~# echo "deb http://apt.pilight.org/ nightly main" >> /etc/apt/sources.list.d/pilight.list
pilight uses a signed repository. This means packages get validated before installation. So, to safely download and install pilight packages the pilight key needs to be installed.
root@pilight:~# wget -O - http://apt.pilight.org/pilight.key | apt-key add -
Now update the apt package list:
root@pilight:~# apt-get update
Note
Debian Buster
root@pilight:~# cd /tmp
root@pilight:~# wget http://apt.pilight.org/pool/stable/main/l/libmbedx509-0/libmbedx509-0_2.6.0-1_armhf.deb
root@pilight:~# wget http://apt.pilight.org/pool/stable/main/l/libmbedtls10/libmbedtls10_2.6.0-1_armhf.deb
root@pilight:~# wget http://apt.pilight.org/pool/stable/main/l/libmbedcrypto0/libmbedcrypto0_2.6.0-1_armhf.deb
root@pilight:~# dpkg -i libmbed*.deb
And install pilight
root@pilight:~# apt-get install pilightWhen no errors are shown, pilight will be installed and automatically started at boot time. To manually start pilight:
root@pilight:~# service pilight startAnd to stop pilight:
root@pilight:~# service pilight stop
Note
pilight makes it easy to install previous version, because all stable versions and all nightly versions between two stable versions will remain available in the apt repository. To see what versions are available, you can run the following command:
root@pilight:~# apt-cache policy pilight
pilight:
  Installed: 7.0.16-g233c268
  Candidate: 7.0.21-ga8b12ea
  Version table:
     7.0.21-ga8b12ea 500
        500 http://apt.pilight.org nightly/main armhf Packages
 *** 7.0.16-g233c268 500
        500 http://apt.pilight.org nightly/main armhf Packages
     7.0.9-gfbc2643 500
        500 http://apt.pilight.org nightly/main armhf Packages
     7.0.8-g953bb85 500
        500 http://apt.pilight.org nightly/main armhf Packages
     7.0 500
        500 http://apt.pilight.org stable/main armhf Packages
     6.0 500
        500 http://apt.pilight.org stable/main armhf Packages
     5.0 500
        500 http://apt.pilight.org stable/main armhf Packages
     4.0 500
        500 http://apt.pilight.org stable/main amd64 Package
In this case, both the stable and the nightly apt repositories are enabled. If you want to install a specific version run the following command:
root@pilight:~# apt-get install pilight=7.0.67-g960219e
Windows 7 and up
- Go to http://download.pilight.org.
- Download the latest Windows executable called pilight-vX.0-win32.exe. Run it to install pilight.
- By default pilight will install into to c:\pilight.
- A default configuration can also be found in that folder.
- If you want to use the pilight USB nano you can use the pilight-usb-nano.hex found in the default folder.
OpenWRT Routers
When using OpenWRT you are assumed also to know how to login to your router with SSH.
Go to http://download.pilight.org.
Download the latest pilight OpenWRT compilation called pilight-Atheros-AR9132-vX.0.tar.gz.
Unpack this file like this:
root@OpenWrt:~# tar -zxvf pilight-Atheros-AR9132-vX.0.tar.gz -C /The OpenWRT package only contains pilight-daemon to save space.
A default configuration is put into /etc/pilight/config.json.
Manually Compiled Version
Warning
We try to provide as many options as possible for you to keep up-to-date with the latest developments. Compiling C software requires some level of expertise, which we cannot and will not provide. This means that no support is given if any issues occur with manually compiling pilight.
Manually compiling pilight is also possible. Use this method is you are not using a Debian-based or a *BSD based operating system or if you plan to actively develop on pilight.
Login to your computer.
Make sure you’ve configured the pilight stable apt repository as described in Linux Debian Based, because some required dependencies are not in the standard repositories. If you cannot use the repository you will need to compile them manually as well.
Make sure you are running as root. Run the following command and use your own password.
pi@pilight:~# sudo su
Password:
Install all packages needed for manually compiling pilight. The best way to do this depends on your operating system. The command needed for Debian is:
root@pilight:~# apt-get install build-essential cmake git dialog libwiringx libwiringx-dev libpcap0.8-dev libmbedtls-dev liblua5.2-dev libluajit-5.1-devThen download the pilight source code from the pilight GitHub:
root@pilight:~# git clone --depth 5 -b [branch] https://www.github.com/pilight/pilight.git
root@pilight:~# cd pilight
Replace the [branch] with either master for the latest stable version. This version is exactly the same as the stable version available through the apt repository. Or use staging for the very latest developmental build. This development version of pilight is also automatically generated each night. You can download it from the pilight nightly repository. If you are developing a new protocol and want to make use of the protocol unit tests, use the rewrite branch.
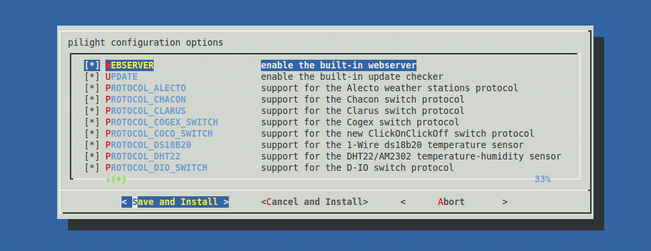
pilight can be compiled with various built-in features which can be included or excluded. This is done through a menu driven program. This program will also automatically compile and install pilight:
root@pilight:~/pilight# chmod +x setup.sh
root@pilight:~/pilight# ./setup.sh
When you are thrown back into the command prompt without error(s), pilight has been installed successfully. It will also install a default configuration in /etc/pilight/config.json, so make a backup of your configuration if you have a previous installation.
Make sure to run the following command after installation:
root@pilight:~/pilight# ldconfigpilight can now be started with:
root@pilight:~/pilight# service pilight start